2006-04-15
To continue my entry from April 8, on color profiles, I thought I'd describe my own setup, which produces perfect prints every time. "Perfect" here means that the prints match what I see on the display--not that the photographs are any better than snapshots.
My computer for this work is an iMac G5, with an integrated 20 in. Apple Cinema Display. Color management on Windows is very similar to what I'll describe, and in most ways it's identical. I have no idea how to manage color on Linux, or even if it's supported by the Linux display drivers, printing applications (e.g., The Gimp), and printer drivers. I think it isn't.
 The first step towards managed color is to calibrate the display with a hardware sensor and matching software.
I use a Spyder 2 Pro Studio (Google it).
You plug it into a USB port, start the app that came with it, and then the sensor reads the display while various colors are shown on the screen. (See photo.)
After a few minutes, it adjusts the display automatically, builds a profile for the result, and installs the profile.
You don't have to do anything except click some buttons; all the measuring and comparing is done by the device and the app.
The first step towards managed color is to calibrate the display with a hardware sensor and matching software.
I use a Spyder 2 Pro Studio (Google it).
You plug it into a USB port, start the app that came with it, and then the sensor reads the display while various colors are shown on the screen. (See photo.)
After a few minutes, it adjusts the display automatically, builds a profile for the result, and installs the profile.
You don't have to do anything except click some buttons; all the measuring and comparing is done by the device and the app.
Once the display is calibrated, you can be sure that whatever you see matches a known standard. This happens because the Apple display driver automatically maps all colors displayed to the standard using the display's profile.
The next step is to edit the photo, which I do with Adobe Photoshop CS2. The program is essentially the same on Mac and Windows. (Photoshop Elements also does color management.) When you edit, you go by what you see, so if the display is off-calibration, you don't know what you're seeing.
Next you print the photo from within Photoshop. You have to make sure that:
- Photoshop determines the printer's colors, not the printer driver, Apple's ColorSync, or anything else.
- The proper profile is chosen. Recall from April 8 that there's a different profile for every printer model and every type of paper.
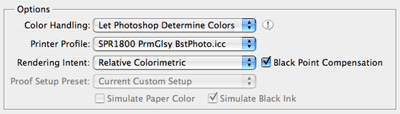
Note the profile; it's what I use for my Epson R1800 and Epson Premium Glossy Photo Paper (one of dozens of available papers). It came on the printer software CD and it works great, so I didn't have to go to the trouble and expense of getting a custom profile made. Unless you use exactly the same printer and paper I do, your profile will be something else. Epson does a good job of posting profiles on their web site but, of course, only for their own papers.
But, if all you do is set the options in that dialog, things won't go right. In the Print dialog (not to be confused with the Print-with-Preview dialog), you have to choose your printer and then ensure that the Print Settings are exactly right. For my Epson R1800, they look like this:
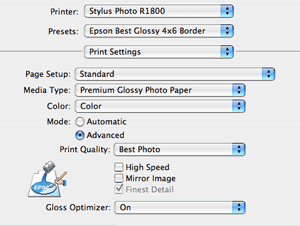
It's tricky to set this up the first time because of the number of choices that are almost, but not quite, the same. For example, Print Quality has to be Best Photo, not Photo. My experience is that even one thing wrong and the colors are messed up. But, once you do get the Print dialog set up, you can save them as a Preset, which is what I've done ("Epson Best Glossy 4x6 Border").
Then, bring up the Color Management options (still in the Print dialog), and make sure it's off.
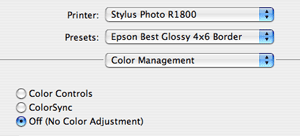
Judging by the posts on various photo forums, this is where most people get it wrong. They think that if they want color management, it shouldn't be off, which is logical but wrong. The "off" here applies to the driver, which is what the Print dialog is setting. We already set things up for Photoshop to determine the colors.
Then you press the Print button. When I do it, I get a perfect print.
Here's a short list of all the user interface screw-ups in color-managed printing:
- The Print-with-Preview, Print, and Page Setup dialogs do different things, and all have critical options to be set.
- You have to tell Photoshop to determine the colors, and the driver to leave them alone. How you do this is very confusing.
- You have to have exactly the right profile, and it's easy to choose the wrong one. ("SPR1800 PrmGlsy BstPhoto.icc" is only one of many that came with the printer.)
- There are many options in the Print dialog, in various option panes, and every one has to be set just right.